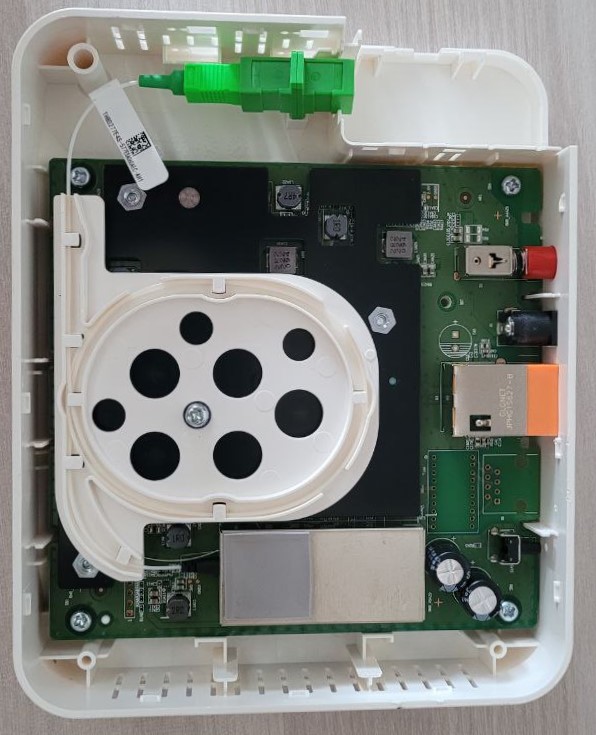
ZTE F2801S
Hardware Specifications
| Vendor/Brand | ZTE |
| Model | F2801Sv2 |
| ODM | ✅ |
| CPU | |
| CPU Clock | |
| Chipset | |
| Flash | |
| RAM | |
| System | |
| 10GBaseT | Yes |
| Optics | SC/APC |
| IP address | 192.168.1.1 |
| Web Gui | ✅ user admin, password admin |
| SSH | |
| Telnet | ✅ 1 |
| Serial | ✅ |
| Form Factor | ONT |


List of software versions
HW V2.0
- V2.0.10P7N1 (OpenFiber)
- V2.0.10P7N2 (OpenFiber)
List of partitions
HW V2.0
| dev | size | erasesize | name |
|---|---|---|---|
| mtd0 | 08000000 | 00020000 | “whole flash” |
| mtd1 | 00200000 | 00020000 | “u-boot” |
| mtd2 | 00400000 | 00020000 | “others” |
| mtd3 | 00400000 | 00020000 | “parameter tags” |
| mtd4 | 00400000 | 00020000 | “wlan” |
| mtd5 | 00800000 | 00020000 | “usercfg” |
| mtd6 | 00400000 | 00020000 | “middle” |
| mtd7 | 02a00000 | 00020000 | “kernel1” |
| mtd8 | 02a00000 | 00020000 | “kernel2” |
| mtd9 | 029e0000 | 00020000 | “rootfs” |
This ONT supports dual boot, as visible from the presence of kernel1 and kernel2, which contain the rootfs. The boot images can be swapped with the following command:
upgradetest switchver X
Where X can be 0/1, based on the image you want to boot from.
You can also clone the currently running image into the other slot using this command:
syn_version
Use
Enable Telnet
python3 zte_factroymode.py --user admin --pass admin --ip 192.168.1.1 --port 80 telnet open
You should get this output and credentials to login over telnet:
trying  user:"admin" pass:"admin"
reset facTelnetSteps:
reset OK!

facStep 1:
OK!

facStep 2:
OK!

facStep 3:
OK!

facStep 4:
OK!

facStep 5:
OK!

done
Username: 2W3iqFVt
Password: Eqb8X8Qt
Enable console redirection
To see omcidebug messages on telnet, execute this command (just the first time of each connection):
redir printf
GPON ONU status
Getting the operational status of the ONU
To check the connection status use the following command:
gpontest -gstate
[gpontest] gpon state is [O5] for O5 state
Getting OLT vendor information
sendcmd 132 omcidebug showmedata 131
This command will print the following output:
##################################
MIB INFO:
         ME CLASS: 131
         DB NAME: olt_g, DBHandle: 32
##################################

<-----MeID[ 0x0000,0 ], Addr[ 0x19a2b1]----->
         Vendorid:48 57 54 43
      EquipmentID:00 00 00 00 00 00 00 00 00 00
                    00 00 00 00 00 00 00 00 00 00
          Version:31 30 00 00 00 00 00 00 00 00
                    00 00 00 00
        TimeofDay:00 00 00 00 00 00 00 00 00 00
                    00 00 00 00
---------------------------------------------------------------------
Querying a particular OMCI ME
sendcmd 132 omcidebug showmedata ID_MIB (eg. 7 for Firmware version)
This command will print the following output:
##################################
MIB INFO:
         ME CLASS: 7
         DB NAME: soft_image, DBHandle: 14
##################################

<-----MeID[ 0x0000,0 ], Addr[ 0x19a011]----->
          Version:V6.0.10N41
     Is committed:01
        Is active:01
         Is valid:01

<-----MeID[ 0x0001,1 ], Addr[ 0x19a031]----->
          Version:V6.0.10N39
     Is committed:00
        Is active:00
         Is valid:01
---------------------------------------------------------------------
GPON/OMCI settings
Setting ONU GPON Serial Number
setmac 1 2176 ZTEG
setmac 1 2177 AABBCCDD
Setting ONU GPON PLOAM password
This can be done easily via the web UI. To do it via the shell use:
setmac 1 2181 1234567890
setmac 1 2178 1234567890
Advanced settings
Backing up ONT Paritions for HW/SW Version Mod
This step is suggested if you want to replace firmware on your ONT to spoof HW and SW version:
Needed tools:
- Linux VM or WSL with Python >3.3
- ZTE Telnet enabler
- TFTP server
The first step is to login over telnet with zte_factroymode.py, then execute ALL these commands for a full backup:
Go to /tmp folder to create tmp files
cd /tmp
**Dump and transfer all mtd **
In the following commands, 192.168.1.2 is the IP of the machine running the TFTP server, change it as needed.
cat /dev/mtd1 > u-boot.bin && tftp -l u-boot.bin -r u-boot.bin -p 192.168.1.2 && rm u-boot.bin
cat /dev/mtd2 > others.bin && tftp -l others.bin -r others.bin -p 192.168.1.2 && rm others.bin
cat /dev/mtd3 > parameter_tags.bin && tftp -l parameter_tags.bin -r parameter_tags.bin -p 192.168.1.2 && rm parameter_tags.bin
cat /dev/mtd4 > wlan.bin && tftp -l wlan.bin -r wlan.bin -p 192.168.1.2 && rm wlan.bin
cat /dev/mtd5 > usercfg.bin && tftp -l usercfg.bin -r usercfg.bin -p 192.168.1.2 && rm usercfg.bin
cat /dev/mtd6 > middle.bin && tftp -l middle.bin -r middle.bin -p 192.168.1.2 && rm middle.bin
cat /dev/mtd7 > kernel1.bin && tftp -l kernel1.bin -r kernel1.bin -p 192.168.1.2 && rm kernel1.bin
cat /dev/mtd8 > kernel2.bin && tftp -l kernel2.bin -r kernel2.bin -p 192.168.1.2 && rm kernel2.bin
cat /dev/mtd9 > rootfs.bin && tftp -l rootfs.bin -r rootfs.bin -p 192.168.1.2 && rm rootfs.bin
Changing region code
ZTE has created various region codes that load default values based on the local ISP. This configuration can be changed using this command:
upgradetest sfactoryconf X
Where X is the number of supported regioncode into file /etc/init.d/regioncode, here is an example from OpenFiber V2.0.10P7N2 firmware:
# cat /etc/init.d/regioncode
19:Turkey
65:FTOrange
116:Tescali
139:Multilaser
188:HollandKpnSfu
198:Manufacture
2010:Cetin
Random notes
- The F2801S reads the software version exposed through the gpon_omci deamon from each kernel partition header, so the only way to spoof this parameter is to change the version in the header and recalculate CRC, otherwise the bootloader will refuse to load the image
Miscellaneous Links
-
It may be possible to flash an alternative firmware to avoid running the
zte_factory.pyscript each time. ↩